Hello!
Here are the steps we took to make our cushions. This is not a ‘How To’ for people that are not already fairly familiar with a sewing machine. ie, you best know what you’re doing. Like I did? Nah, this is in huuuuuuuuge thanks to my incredibly talented mother who rocked this project with me. I can’t even sew on a button.

Materials:
*Foam/ cushion inserts (we chose a queen size mattress pad)
*1 Electric cutting knife like this one
*Fabric (for a mattress that was 60″x70″, we needed 8 yards)
*1 zipper per cushion (for us that was 5)
*[Optional] medium thickness batting (we needed 7 yards)
Step 1: Measure and determine your layout
*We went through a few designs but in the end, we wanted three cushions for seating and two back rests that when removed, would be placed side-by-side atop the lowered dining table and complete our sleeping area. [Photo soon!]
Step 2: Buy your supplies
*You want upholstery fabric or really anything with some thickness to it. These guys are going to get beat up so you want durability. Ours is a microfiber that almost exactly matches our old couch in Brooklyn- what can I say, old habits die hard. Don’t forget zippers for each pillow- about 3/4 long as the length of your cushion.
*Based on the dimensions of your couch, purchase a mattress pad and an electric knife (USING THIS IS WAY TOO MUCH FUN). Our bed is 60″x70″ and a queen mattress is 60″x80″. We went with memory foam that apparently is proven to heat you up a bit but we figured we could always flip the cushions over if it got too hot.
Step 3: Draw your measurements on the foam
*If your dimensions are like ours, you are drawing and cutting your foam as if it were a puzzle that once cut can fit perfectly back together. The electric knife truly cuts like butter and is fairly precise so be careful! Our final measurements below (yeah, they got a little weird)… Cut along the solid lines :).

Step 4: Cut the fabric
*Look at your dimensions. Cut fabric one inch longer than what is written. The extra inch will be for your seam. For example…

Step 5: Sew!
As previously mentioned, this project is not for the amateur seamstress so I won’t deep dive into how these bad boys are put together but below are some tips that helped us:
*Sew all of the side panels onto the top of your cushion first so that when done it looks like a thick (and wonky) plus sign. Remember to place your pins half an inch in to remove the added inch you measured into your fabric.
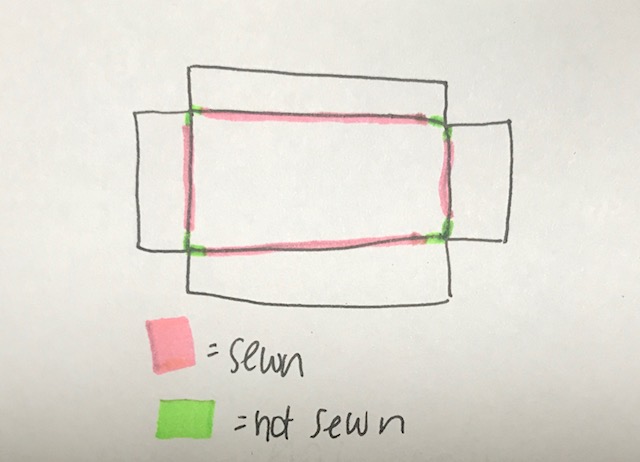
*This is key to sewing precise corner pieces: leave half an inch not sewn where your two panels connect into the corner of your cushions as seen in green below. By leaving this gap, it allows you to connect your two adjoining panels and create a uniform stitch (one where there is a half-inch of seam sewn around all edges).
*After the panels are on, sew the corners by joining the panels together. When this is done, your cushion should be able to fit on top of your foam and appear complete- save for the addition of the bottom panel.
*Flip the fabric you’ve sewn inside out and sew on your bottom panel. Do not forget that one of the long sides now needs a zipper!
Step 6: Add some extra softness
* Fabric done? Groovy. We chose to wrap our cushions with some extra batting to really fill out the covers. The batting was literally stapled together- nothing fancy here!


Step 7: Enjoy
If any of the above needs clarification, shoot us a message and we’ll be happy to help!

Hey! Where’s the shot of me at the Singer Featherweight?
LikeLike